Tuesday, July 31, 2012

NEW COLORS!!!

I love this light blue!!! It doesn't have any shimmer to it at all, and you only need two coats. The brush is also very dense for full coverage. All of these colors were only $1.99 each!


I like the shimmer on this one :3

For this I painted two coats of 'I need a refresh-mint' and one coat of 'Frozen  Solid' on top. Love the combo!

These will all go perfect with my collection :)

Sunday, July 29, 2012

Pattern Manicure

This is waaay more easy than it looks. I love the red and the white together; they both make each color look more appealing!
What you need:
Red, white, and black polish
Materials for clean up

First you want to start off with one of the colors that you chose for a base. Wait until this layer is completely dry before adding the next.
Taking the second color, apply a stripe-thing towards the top of your nail. I did two coats of the white because on the first one the red streaked through from the bottom. If you want to make sure you have a straight line, you can use tape; but since I put a black stripe over the line anyways I free-handed it. I also wasn't afraid to get the polish on my fingers since the white comes off very easily.
Add the black stripe.
Draw random lines in any pattern over the white. This is where you can conceal any mistakes that were made in the white polish by covering them up with the black. When you want to put the top coat over, place a big glob of the polish near the cuticle, and swipe very quickly, over the whole nail just once to make sure you don't streak the other colors into the white.
What I used:


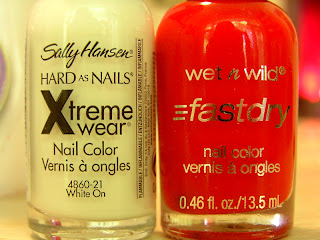
'White On,' and 'Everybody loves Redmond.'
The top coat I got from Sally's for $4.99. The black was a dollar at Target.

Thursday, July 26, 2012

Favorites From my Jewelry Collection!

 Today I photographed my entire jewelry collection. There were at least 100 pictures, so I narrowed it down to my top favorites. It was a hard choice! For most of them I don't remember how much they were or where I got them; I've been collecting them for quite some time. Enjoy!


This one I bought from an Avon catalog around Christmas time. I don't wear it much because I think it's more of a winter piece. But i love how unique it is!

My sister left this one behind when she moved out. One of the back petals is missing, but you don't really notice that because you can move them around.
Another one she left behind :)
This is one of my absolute favorites. I just wish I had more excuses to wear it! It's a little too flashy to wear it to school but sometimes I can't resist. 
I looooove that color.
I wore this one to a wedding; again a bit too flashy for school in my opinion. But I still love it!
I have to admit I haven't ever worn this one before. It's still really cool to look at!
This is a locket type necklace. The bigger heart opens up and you can buy charms to put inside. I got it from Hallmark. These charms are really the only ones I liked since I like my jewelry to look a little more elegant. 
The last of my favorites is this! I'm not even sure what kind of stone that is in the middle; but I think it's really pretty! I bought it from a craft fair a few years ago when I was on vacation.

Wednesday, July 25, 2012

Abstract Manicure How-to

What you'll need:
Three colors of your choice
Some kind of tape
Q-tips and nail polish remover for cleanup
First start off with a completely dry base. Here I am using No Hard Feelings by Sally Hansen.
I prefer to use electrical tape because it's much more easy to work with.
Tape the part of your nail that you want to paint with the second color. Make sure the edges of the tape are pushed down so the color doesn't leak underneath. 
And peel off when it is slightly dry. Push down any polish that rises. If you're like me it will get messy, but as always cleanup is easy.
After the second color is completely dry, Tape over the nail so you know where you want the third color to go. Each nail is like a canvas; they can all be the same or completely different!
Again wait until the color is slightly dry, or 'tacky.' And peel off the tape. 
I finished with two layers of top coat to even out the surface. This was really easy to do; but pick a day to do it where you have time. The drying process can take a while! I hope you liked it :3


Matrix Total Results Silk Wonder serum

This magic in a bottle is my daily Moisturizing, de-frizzing, and smoothing oil. 

I loooove this product. I got it when I was still in the phase of straightening my hair everyday. Even with all that damage, it made my hair so soft and manageable. It acts as a heat protector, and it protects your hair from all of the elements outside. (I remember mentioning that in my earlier post about my hair care routine.)
How I use it: 
After the shower, I put about a dime sized amount mostly on the lower ends of the hair, I rub it in quite a bit to make sure there are no big globs of it anywhere, then I style as usual. If I am blow drying or straightening, I will use about a quarter sized amount and smooth it all over before any heat styling. Then when my style is complete, I will finish off with a very small amount on my roots to keep the frizz down. The consistency is perfect, it's not like a gel but it's not as thin as water either. And the smell is terrific!
I bought it at my local salon. I haven't been able to find it anywhere besides the salon and Amazon.com. I get most of the salon products online because they are a lot cheaper. 
And last is a picture of my hair! Not too shabby. I found that if you do use an excess amount, it can make your hair look oily. You really do need to use it a few times to make sure you have the perfect amount for your length of hair. As you can see- I don't have much frizz and it really defines my natural waves. Also, if you were to curl your hair and add in the oil, it helps to hold the style in place. I promise your hair wont fall if you smooth this in.


Monday, July 23, 2012

Gradient Nail Tutorial With Accent Splatter Nail


I love this look for summer! It's super easy and it takes no time at all.
What you'll need:
Three polishes of your choice- It works best if they are the same color but just a lighter shade.
Black polish for the splatter
A straw
Cosmetic Sponges
Nail polish remover and Q-tips for the clean up
Tin foil
And a base coat and a top coat.
 
First, paint the gradient on to the sponge. Make sure the color will completely cover your nail. It will get on your skin, but cleanup is easy.
When you have the gradient painted, push the sponge on the tin foil to remove the excess polish. Then, slowly roll the sponge over your nail. Don't roll it again until it is completely dry; the polish underneath will come off. Do this step multiple times until you reached the desired effect.
For the splatter, take your straw and dip it in the bottle of the black polish. I recommend dipping it directly into the bottle because it guarantees that you have enough to splatter. After you dip the straw, blow into the other end over your nail with a lot of force. This can get messy, so make sure the tin foil is under your finger, and your fingers are separated so you only get the black on one nail. Make sure you blow through the straw hard and fast so the polish will come out.


After this is done, wait at least 10 minutes and apply a top coat! I told you it was super easy.

What I used:


Can't wait to do a tutorial for this! Should be later tonight.


Sunday, July 22, 2012

More Polish :)


7/22/12

Sorry it's been so long! 
I was at a friends house for a weekend :)

Again, the pictures are un-edited. I wanted to express the actual color as much as I could. I actually got these at the dollar store! Less than $12 for all eight.